pylon AI: Create Image Analysis Functions
Optimize application-specific AI models and set up image analysis
Learn how to solve your specific vision problem with our AI software through this tutorial. The core of your application — your AI model — is optimized and benchmarked using our software. You load the model onto the pylon AI platform and enhance it using your own image data. You then transfer the model to a specific pylon AI vTool, which executes it directly in your application.
Prerequisites
To get started with pylon AI, you need access to the pylon AI Platform, and the pylon Software Suite and pylon AI Supplementary Package downloaded and installed.
Create a new project
Start by creating a project, which the image data and AI model will be uploaded to during the next step. Select the desired image analysis function accordingly.
Click on the section My Projects on the left-hand side. Then click the Create project button at the top.
Under Project type, select the image analysis function (represented by a pylon AI vTool).
Assign a project name under Project name.
Optionally, enter a project description under Project description.
Click on the Create project button at the bottom.
The new project now appears in the My Projects section.
Upload and map image data set and AI model
The following section describes how to upload your own data set of annotated sample images and your own AI model into the platform and assign (map) them to each other via project classes.
Upload image data set
Open your existing project in the My Projects section.
Under Data Sets, click on the Add data set button.
Enter a name and a description for your data set under Data set name and click Add.
On the Upload Data page, select the data format under Data format.
To add your own data set, click Browse under Add data.
The result, such as the number of images and associated data set classes, is displayed on the right under Data Validation. To include image annotations, leave the preselected option (active) under Annotations. Note: The annotations are no longer available after the upload. This means you have to create data set classes (see next step).
Under Class Mapping, press the Map classes button. Use the Autocreate classes button to create data set classes automatically based on your annotations. Alternatively, to perform this process for each class manually, click on the arrow to the right of each class and select Add new class.
Click the Upload button. Once the upload is complete, click Go to data set in the upper-right corner under Upload completed. You can now publish the project by clicking the Publish button (press twice).
Upload AI model
Click Models in the horizontal bar, and then click the Add model button.
Under Model name, enter a name and the description text for the AI model, then click Add.
Under Model configuration, click on the arrow on the right and select your model configuration.
To add an AI model, press the Browse button under Add data.
After uploading, you can check the model classes using the Show classes button under Model classes.
Click on the Finish button.
Mapping of image data set and AI model
Click on Mapping in the horizontal bar to assign the classes of data set and AI model to the project classes.
To automatically assign the data set classes to the project classes, click on Automap under the Data Set Classes tab and then on the Map classes button.
Click the orange icon to assign a different color to it.
Switch to the Model Classes tab. There, click on Automap and then on the Map classes button.
Optimize AI model in test run
Performance benchmarking: Check the behavior and performance of your optimized model on different processing hardware.
Click Trials in the horizontal bar. Then click the Create trial button and enter a name and description under Trial name.
To add your image data set, click on Add data set under Data set. Select the data set and click on the radio button. Click on Add data set.
To add your AI model, click on Add model under Model. Click on the radio button to select your model and then on Add model.
To view the data set classes and model classes that have already been mapped, press the Show mapping button under Project mapping.
Click on Create.
Click on Add trial run, select the hardware, and click on Select hardware. Use the arrow to select the ONNX model format respectively the processing hardware.
To add another piece of hardware, click Add trial run again. Select the hardware and click on Select hardware. Use the arrow to select the ONNX model format respectively the processing hardware again.
Click on Run trial. The system now determines the frame rate, latency, reliability, and power consumption for the respective processing hardware.
Click the three dots at the far right of the row and select Inference results to view the inference results for the images in the dataset. You can hide the annotations for each image by selecting Annotations on the right.
Release and download
You have two options when releasing the bundle of image data and AI model. You can download the bundle as a ZIP file (as described here) or drag it directly into the pylon AI vTool without downloading if an online connection is available (as described underneath under point 5.1).
Select a piece of hardware or processing hardware from the list, then click the three dots at the far right of the row and select Release bundle. Enter a name for the bundle and click Release bundle.
Select the bundle from the list, then click the three dots at the far right of the row and select Go to bundle.
Review the details and click Download. Save the bundle by clicking Save.
Load AI model into the pylon AI vTool
In the pylon Viewer, load the optimized AI model into the pylon AI vTool using drag-and-drop. This is possible online or offline.
Open the pylon Viewer app on your desktop. Download pylon
Drag the pylon vTool "Image Loading" from the pylon vTools list in the top left corner into the Workbench and open the communication window by double-clicking on the pylon vTool.
Use the three dots to open the storage location of your image data to be analyzed and to open them in the pylon Viewer.
Now select the pylon AI vTool that you want to use for image analysis, respectively for the AI model you optimized on the pylon AI platform. Open this pylon vTool by double-clicking on it to set the inference options.
Under Inference Settings, clicking on the update arrows automatically connects the correct inference server, which you can also edit manually. Click on Connect.
Under Model Selection, select the desired model type that you previously optimized and released from the dropdown.
If your bundle does not yet appear in the selection, you can use the pylon AI Agent to deploy it offline via the local storage. Alternatively, if an online connection is available, it is also possible to access the bundles optimized on the pylon AI platform directly.
Drag and drop the optimized bundle into the window. Then click on Deploy.
Under the Deployed Models tab, you can see all your models and manage them. You can then close the window.
Now you can select the deployed bundle in the dropdown or use the update arrows to automatically fill it with the latest version.
By clicking on Ok you are ready to start your image analysis.
Learn in this Tutorial how to set up your image processing and analysis with the pylon vTools and create recipes.
Detailed: Basler Product Documentation
The exact specifications and detailed product documentation for pylon AI can be found here: pylon AI Documentation
We have also integrated the documentation for all pylon vTools into the Basler pylon Software Suite:
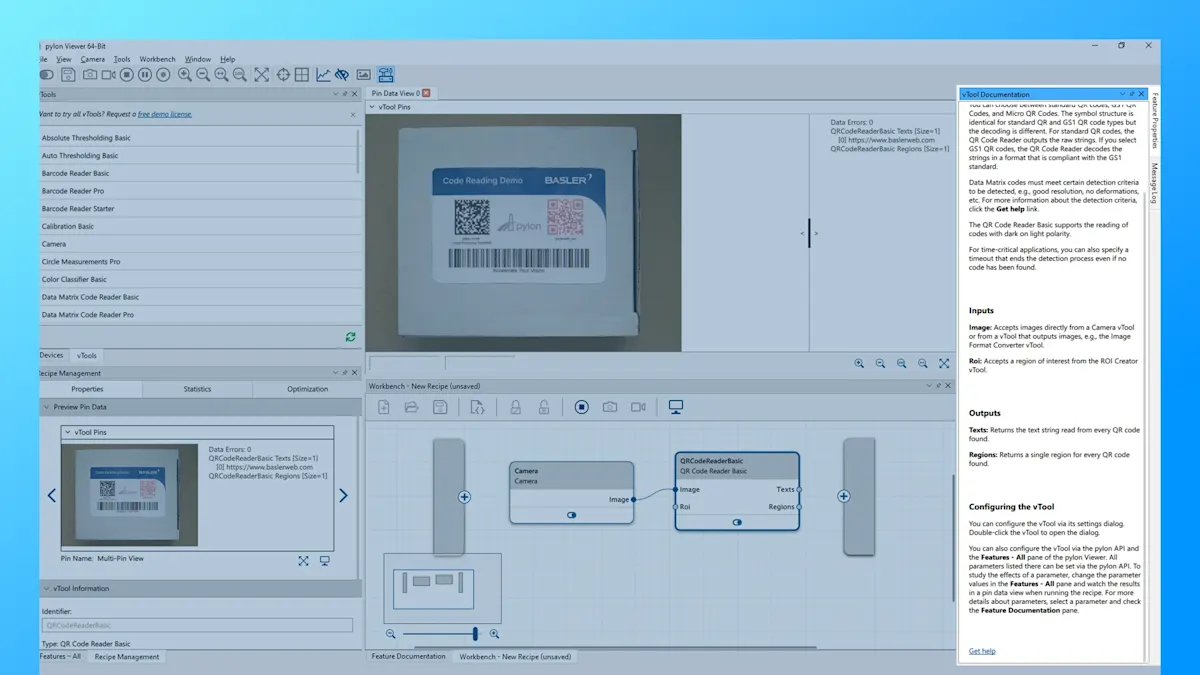
The vTool Documentation area on the right-hand side of the pylon Viewer provides a brief overview on the currently selected pylon vTool.
For more detailed information, scroll down to the bottom and click on Get help. The link leads to the Basler Product Documentation.
Note: The Basler Product Documentation can be accessed from the pylon Viewer at any time, even without an internet connection.
Interested in pylon AI and want to try it out?
Register now for free and test the pylon AI platform and the pylon AI vTools with the classic pylon vTools for the full range of features. AI model optimization and image analysis made easy — find out how easily you can solve your vision task.
Register & test free of chargeMore tutorials on pylon vTools


pylon vTools
Flexible software add-ons for machine vision
With the modular pylon vTools, you do not have to purchase an extensive vision library - only the image processing functions you require. You can then select tools based on artificial intelligence or classical algorithms as well as the appropriate license (Starter, Basic, an Pro license) with your desired range of functions.