Lighting techniques for Machine Vision
Different lighting techniques create distinct image representations of an object, highlighting different surface features and characteristics. Therefore, different lighting techniques can be used to address various inspection tasks.

Headlight illumination
The camera and the light source are located on the same side relative to the object being viewed, so that the light is reflected off the 'objects surface. This technique is particularly ideal for matte, low-reflectivity surfaces. For highly reflective surfaces, additional diffuser films or specially designed diffusing lighting types are used.

Transmitted light illumination
The object is positioned between the camera and the light source, with the light source located opposite the camera. Light passes through the object, causing it to partially or completely block the light entering the camera. As a result, only the outline is visible—for example, to precisely determine dimensions, object outlines, recesses, or fill levels for inspection and measurement tasks.

Dark field light
The light is directed onto the object at a shallow angle so that only areas lying at a specific angle to the camera reflect light. As a result, most of the image remains dark, while edges, scratches, engravings, and other surface defects become clearly visible due to bright reflections. This technique significantly increases the contrast and visibility of defects.

Horizontal ring lighting
With this type of lighting, unlike with standard ring lighting, the object is illuminated from the side rather than directly from the front. This causes light to be reflected into the camera, particularly along the edges. This ensures that contrasts are clearly defined and scratches are easily visible. Darkfield illumination is particularly important for transparent objects, such aswindows or films, as the lateral light source prevents shadows or reflections from forming.
Lighting brightness
The brightness of the lighting is crucial for reliable image capture: Too little light results in noisy or dark images. Too much light can overexpose details and cause information to be lost. Optimal brightness ensures high contrast and uniform illumination of the object being inspected. It forms the basis for stable and reproducible measurement results in vision systems.
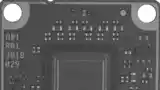
Not enough light
Insufficient light results in dark, noisy images, making it difficult to detect fine details. Contours and structures become blurred or are lost entirely. Image analysis becomes unreliable, and errors in inspection increase.
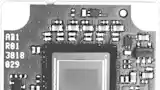
Too much light
Too much light leads to overexposure. This can cause important details and information to be lost. Bright areas appear flat, and reflections can further impair image quality. The risk of misinterpretation increases.

Invisible wavelengths: UV light
Ultraviolet (UV) light, with wavelengths below 400 nm, reveals hidden details through fluorescence or changes in reflectivity—such as security features, adhesive residue, or hairline cracks—using UV cameras and illumination techniques. UV Illumination such structures can be identified efficiently and reliably.
Targeted light manipulation
Through targeted manipulation of light, surface structures can be made visible, reflections can be controlled, and contrasts can be enhanced. With appropriate lighting strategies, the light is precisely tailored to the inspection task, thereby increasing process reliability and reproducibility in quality assurance.
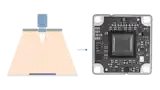
Diffuse lighting
Diffuse lighting distributes light evenly across the object being inspected, thereby minimizing distracting shadows and reflections. This makes details visible—especially on shiny, textured, or uneven surfaces—that are often lost with directional lighting. Typical applications include the inspection of plastic parts, printed circuit boards, or metallic surfaces. Diffusers, light domes, or special panel lights are used to achieve this effect.
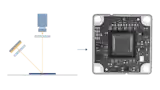
Polarized lighting
Polarized lighting specifically reduces or highlights unwanted reflections by using polarization filters on both the light source and the camera. This significantly minimizes reflections on non-metallic surfaces such as glass, plastic, or painted surfaces (the effect is often limited on metallic surfaces). This improves the detection of scratches, cracks, or other surface defects and increases image contrast for reliable evaluation.
Frequently asked questions about proper lighting
White light is used when the goal is to achieve the most natural color reproduction possible. Colored light—such as blue, red, or infrared—is typically used with monochrome cameras to make specific features more visible through differences in contrast.
Infrared light can reveal features that are invisible to the human eye. This makes it particularly well-suited for workplaces where visible light would be a distraction.
Depending on the color of the light, certain colors on the test object appear lighter or darker. For example, blue light makes blue and white areas stand out, while red and green areas appear darker.
Lighting from many different angles—such as with a ring light—hides scratches and highlights other important features, such as imprints or colors, without casting distracting shadows.
When photographing highly reflective objects, diffuse light sources or additional diffuser sheets should be used to minimize distracting reflections and achieve uniform illumination.